+61-1300-332-888
 +1-480-241-8198
Our Blogs
When it comes to obtaining new customers, lead generation plays an important role. Organizations use a variety of strategies and tactics to attract customer interest through events, seminars, and guiding potential clients through the sales cycle.Leads attained Via website is one of the most important ways to ensure business sustenance in the current era. When you have visitors on your website, you probably don’t want them to visit once and leave.

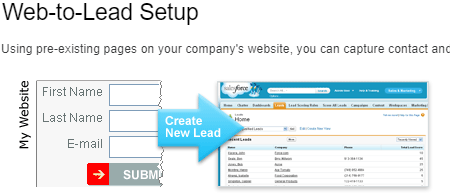
You will surely want to know more about the visitors such as their name, email addresses, contact number, and the reason for their visit. You can build most of the web traffic by turning the visitors into leads, following which your marketing and sales team can drive them down the sales funnel. This has become possible with Salesforce web to lead functionality that has the potential to handle volumes of web visitor data.
Under the hood and technical insights
Salesforce have a lot of cool features and to capture the visitor’s data from the website as a ‘Lead’ in your salesforce, “Web to Lead” functionality is the best way to go.
To make this Salesforce feature works productively, follow the below steps for the creation of “Web to Lead” form:
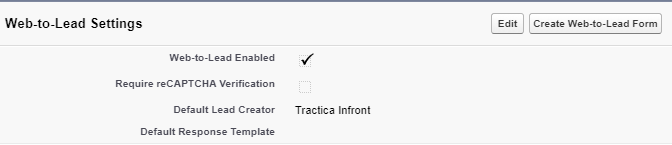
- Go to Settings-Setup-Web to Lead
- Enable Web to Lead and assign “Default Lead Creator”, this user will be used as a lead creator in salesforce from Web to lead form.
- Click “Create Web-to-Lead Form” button to create the form with required fields to capture the new leads from website.
- The below wizard will open on your screen.
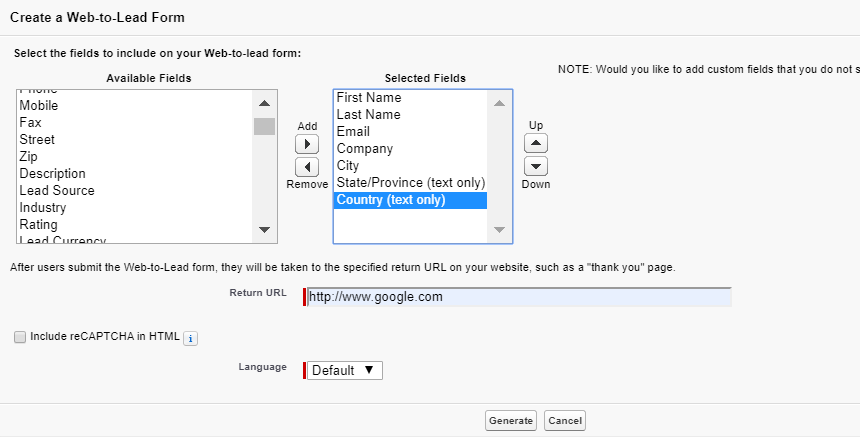
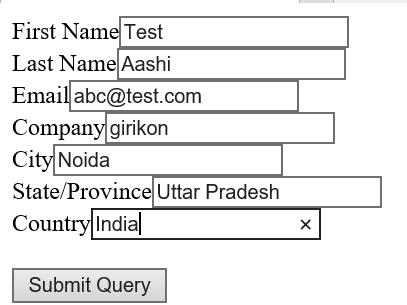
- Select the fields and its sequence you want to capture on your website
- Select the return URL on which the lead will be routed after the user hit ”Submit”.
- Click “Generate button to generate the HTML code for Web to lead functionality to work. Copy the below code and embed it in your website.
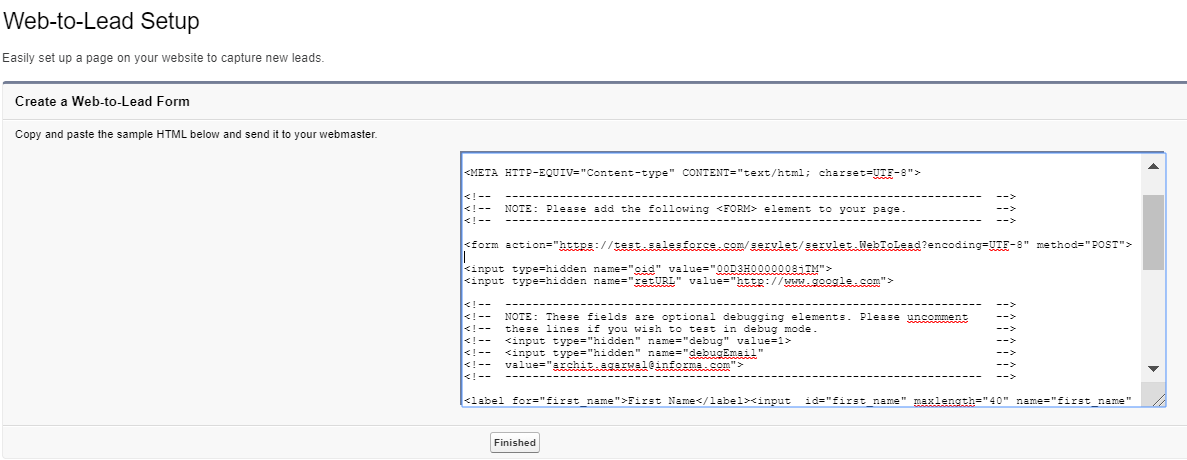
However, there is no need to change the below component in code.
- “Action”– It specifies the URL
- “Method = POST”– It sends form data in the body of HTTP request
- Hidden field value of component name “oid”– It contains the Organization Id. from which salesforce get to know in which organisation leads should be created.
Once the Web to lead form is embedded on the website, the visitant data will be loaded in the salesforce as a new lead. To ensure the web leads appear in salesforce,do the following steps:
- Go to Lead Tab
- Click on the default Queue, selected as the default creator
- All leads will be displayed on your screen
How to change the ownership of the lead:
- Create an assignment rule and add the filter criteria
- Assign the assignment rule to the new Queue/ User
- Check “Send Email to Members” check box, in case you want to notify the users of the queue or user every time a lead is submitted

- HTML FORM

The new web lead will be assigned to the new Queue/User as soon as it enters in the salesforce if criteria will match, else the default queue will remain the owner of the lead.
Email Auto-Replies for the Customers
One last item to consider is – auto reply to the customer’s email who are submitting the leads via web and to make this work more professionally, use the generic email instead of an email coming from a default owner. The auto reply should come from your company or at least from your sales department. Following points to be taken care of while auto-replying:
- Do not use the “Default Response Template” email section in the Web to leadsetup.
- Instead set up an “Organization-Wide Email Addresses” for your auto-response emails such as “Sales@abcCompany.com”.
- Create a new email template and use it for your auto-response email which is relevant for your customers.
- Set up a “Web-to-Lead Auto-Response Rule” which will automatically send an email to the Lead submitter using the email template from step 3, using the email address from step 2.
Conclusion
Salesforce can help your business grow into a more process-oriented organization. Its “Web to Lead” functionality can automate the process of lead generation through the website without any manual intervention. The data captured can be used by the Sales and marketing teams to build the campaigns effectively. The web-To-lead forum is self-operating and once embedded in the website can gives you accurate results, and will increase the efficiency and effectiveness of the sales cycle.
About Girikon
As a reputed name in the IT space, Girikon offers a wide-array of services including Salesforce consulting, Salesforce implementation and Salesforce support. As a reliable service provider, the company offers its global clientele with sustainable growth.
About Author

Arushi is a PD1 certified Salesforce developer. She has deep knowledge of Conga composer, Admin Configuration, Apex Development, Integration, Sales Cloud, CPQ, Lightning Component, and Lightning Web Component. She spends her leisure time reading books and blogging.
Share this post on: